分类 默认分类 下的文章

通过点餐系统的例子教你 TypeScript 的基础使用。

  1. 基础类型定义
// 基础类型
let price: number = 88;  // 数字
let dishName: string = "红烧肉";  // 字符串
let isSpicy: boolean = true;  // 布尔值
let orderDate: Date = new Date();  // 日期对象
  1. 接口定义
// 定义菜品接口
interface MenuItem {
    id: number;
    name: string;
    description: string;
    price: number;
    sales: number;
    check: boolean;
}

// 定义分类接口
interface Category {
    id: number;
    category: string;
    items: MenuItem[];
}
  1. 使用接口改写现有代码
// 原来的代码
let categories = reactive([{
    id: 1,
    category: "凉菜",
    items: []
}])

// TypeScript版本
let categories = reactive<Category[]>([{
    id: 1,
    category: "凉菜",
    items: []
}])
  1. 函数类型定义
// 原来的函数
function selectFood(c) {
    categories[currentIndex.value].items[c].check = !categories[currentIndex.value].items[c].check
}

// TypeScript版本
function selectFood(index: number): void {
    categories[currentIndex.value].items[index].check = !categories[currentIndex.value].items[index].check
}
  1. Vue组件中使用TypeScript
// 在 setup 中使用
import { ref, computed } from 'vue'

interface Props {
    initialCategory?: number;
}

export default defineComponent({
    props: {
        initialCategory: {
            type: Number,
            default: 0
        }
    },
    setup(props: Props) {
        const currentIndex = ref<number>(0);
        const currentChild = ref<Category[]>([]);

        // computed 属性
        const checkedItemCount = computed((): number[] => {
            return categories.map(category => 
                category.items.filter(item => item.check).length
            );
        });

        return {
            currentIndex,
            currentChild,
            checkedItemCount
        }
    }
})
  1. 数组和对象的类型定义
// 数组类型
const prices: number[] = [88, 66, 128];
const dishNames: string[] = ["红烧肉", "青椒肉丝", "麻婆豆腐"];

// 对象类型
interface OrderDetail {
    orderId: string;
    dishes: MenuItem[];
    totalPrice: number;
    createTime: Date;
}

const order: OrderDetail = {
    orderId: "ORDER_001",
    dishes: [],
    totalPrice: 0,
    createTime: new Date()
};
  1. 枚举类型
// 定义菜品状态枚举
enum DishStatus {
    Available = "available",
    SoldOut = "soldOut",
    Hidden = "hidden"
}

// 使用枚举
interface MenuItem {
    id: number;
    name: string;
    status: DishStatus;
}

const dish: MenuItem = {
    id: 1,
    name: "红烧肉",
    status: DishStatus.Available
};
  1. 类型断言
// 有时候你比TypeScript更了解某个值的类型
const menuElement = document.getElementById('menu') as HTMLDivElement;

// 或者
interface CartItem extends MenuItem {
    quantity: number;
}

const cartItem = {
    id: 1,
    name: "红烧肉",
    quantity: 2
} as CartItem;

实际使用建议:

  1. 先从简单的类型定义开始
  2. 逐步添加接口定义
  3. 为主要函数添加参数和返回值类型
  4. 使用 VS Code 等支持 TypeScript 的编辑器,可以获得更好的代码提示

错误示例:

// ❌ 错误的类型定义
let price: any = 88;  // 避免使用 any

// ❌ 类型定义不明确
let items = [];  // 应该指定数组元素类型

// ✅ 正确的做法
let price: number = 88;
let items: MenuItem[] = [];

TypeScript 的主要好处是可以在开发时就发现潜在的类型错误,提高代码质量。
在Vue 3中,如果你想在渲染前处理数据,你可以使用几种不同的生命周期钩子和响应式API来确保数据被正确处理。以下是一些常用的方法:

1. 使用 setup 函数

Vue 3引入了Composition API,其中setup函数是组件实例被创建之前执行的,适合在这里进行数据的初始化和处理。

<script setup>
import { ref, onMounted } from 'vue';

const data = ref(null);

onMounted(async () => {
  // 假设 fetchData 是异步获取数据的函数
  const result = await fetchData();
  data.value = result; // 处理并设置数据
});
</script>

2. 使用 onBeforeMount 生命周期钩子

如果你使用的是Options API,可以在onBeforeMount生命周期钩子中处理数据。

export default {
  data() {
    return {
      data: null,
    };
  },
  methods: {
    fetchData() {
      // 异步获取数据
    },
    processData(data) {
      // 处理数据
    }
  },
  mounted() {
    this.fetchData().then((data) => {
      this.data = this.processData(data);
    });
  }
};

3. 使用 watchwatchEffect

如果你需要在数据变化时进行处理,可以使用watchwatchEffect

<script setup>
import { ref, watch } from 'vue';

const data = ref(null);

watch(data, (newData) => {
  // 在数据变化时进行处理
  console.log('Data has changed:', newData);
});
</script>

4. 使用 computed 属性

如果你需要根据现有数据派生出新数据,可以使用computed属性。

<script setup>
import { ref, computed } from 'vue';

const rawData = ref(null);

const processedData = computed(() => {
  if (!rawData.value) return null;
  // 对 rawData 进行处理
  return rawData.value.map(item => ({
    ...item,
    processed: true
  }));
});
</script>

5. 使用 asyncawait 获取和处理数据

setup函数中,你可以使用asyncawait来异步获取和处理数据。

<script setup>
import { ref } from 'vue';

const data = ref(null);

async function fetchData() {
  const response = await fetch('your-api-url');
  const result = await response.json();
  // 处理数据
  data.value = result.map(item => ({
    ...item,
    processed: true
  }));
}

fetchData();
</script>

通过这些方法,你可以在Vue 3中灵活地在渲染前处理数据,确保组件正确地显示和使用数据。

  1. 图片优化:
import Image from 'next/image'

// 使用 Next.js 的 Image 组件替换普通 img 标签
export function OptimizedImage({ src, alt, ...props }) {
  return (
    <Image
      src={src}
      alt={alt}
      loading="lazy"
      placeholder="blur"
      blurDataURL="data:image/jpeg;base64,/9j/4AAQSkZJRg..."
      {...props}
    />
  )
}
  1. 组件懒加载:
// 将非首屏组件改为懒加载
import dynamic from 'next/dynamic'

const DashboardChart = dynamic(() => import('./DashboardChart'), {
  loading: () => <p>Loading...</p>,
  ssr: false  // 如果组件不需要服务端渲染
})
  1. 路由预加载:
import { useRouter } from 'next/router'
import Link from 'next/link'

export function Navigation() {
  const router = useRouter()
  
  return (
    <Link 
      href="/dashboard"
      onMouseEnter={() => router.prefetch('/dashboard')}
    >
      仪表盘
    </Link>
  )
}
  1. 优化字体加载:
import { Inter } from 'next/font/google'
 
const inter = Inter({
  subsets: ['latin'],
  display: 'swap',
  preload: true,
})
  1. 添加缓存策略:
import { unstable_cache } from 'next/cache';

export const fetchInvoices = unstable_cache(
  async () => {
    // 数据库查询逻辑
  },
  ['invoices-cache'],
  {
    revalidate: 3600, // 1小时后重新验证
    tags: ['invoices']
  }
)
  1. 优化 API 请求:
// 使用 SWR 进行数据请求和缓存
import useSWR from 'swr'

export function useInvoices() {
  const { data, error } = useSWR('/api/invoices', fetcher, {
    revalidateOnFocus: false,
    revalidateOnReconnect: false
  })
  return { data, error }
}
  1. 添加页面元数据优化:
export const metadata = {
  metadataBase: new URL('https://your-site.com'),
  alternates: {
    canonical: '/',
  },
  openGraph: {
    title: '您的网站',
    description: '网站描述',
  }
}
  1. 配置构建优化:
/** @type {import('next').NextConfig} */
const nextConfig = {
  compress: true,
  poweredByHeader: false,
  reactStrictMode: true,
  compiler: {
    removeConsole: process.env.NODE_ENV === 'production',
  },
  experimental: {
    optimizeCss: true,
  },
}

module.exports = nextConfig

其他建议:

  1. 服务端优化:
  • 使用 CDN 分发静态资源
  • 启用 Gzip/Brotli 压缩
  • 配置适当的缓存策略
  1. 代码分割:
  • 合理使用动态导入
  • 避免不必要的大型依赖包
  • 使用 bundle 分析工具优化包大小
  1. 性能监控:
export function reportWebVitals(metric) {
  if (metric.label === 'web-vital') {
    console.log(metric) // 发送到分析服务
  }
}
  1. 预连接关键域名:
<link rel="preconnect" href="https://your-api-domain.com" />
<link rel="dns-prefetch" href="https://your-api-domain.com" />
  1. 使用 Service Worker:
self.addEventListener('install', (event) => {
  event.waitUntil(
    caches.open('v1').then((cache) => {
      return cache.addAll([
        '/',
        '/styles/main.css',
        '/scripts/main.js',
      ])
    })
  )
})

实施这些优化后,建议:

  1. 使用 Lighthouse 进行性能测试
  2. 监控实际用户性能指标
  3. 根据分析数据持续优化
  4. 考虑使用 Next.js 的 ISR 或增量静态再生成
  5. 实施渐进式加载策略

这些优化措施可以显著提升网站的首次加载性能。需要根据具体项目情况选择合适的优化方案。

错误提示:

App running at:

Note that the development build is not optimized.
To create a production build, run npm run build.

node:events:491

  throw er; // Unhandled 'error' event
  ^

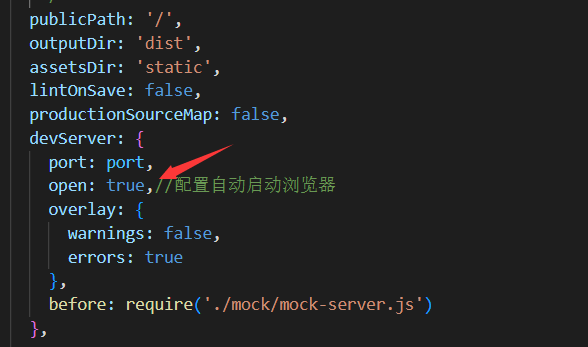
在尝试过关闭占用端口后还是无法解决,最后找到vue.config.js文件中
微信图片_20231113122945.png

将open中的true改为false即可正常运行

至于端口号我这边是指定为8080的了

在package.json中的dev中加 --port 8080即可指定端口号